
When you hire a contractor, ask about their insurance and bonding. This is an important part of any job. You want to know that the contractor is insured and bonded if a worker gets injured.
Joists are essential for the structure of your deck. Replacing a rotting or damaged joist can be expensive, especially in areas with high living costs. For more information, just visit Deck Repair Charleston SC.
Staining is a vital step in deck maintenance that protects the surface from water, sun, humidity, and other weather elements. A new coat of stain will prevent the wood from warping or rotting over time. Staining costs $540 to $1,250, and the best stain options are transparent types that let the grain show through and match the color of the siding on a home. Some stains have a built-in sealer and can be applied with a synthetic brush or roller.
Warped boards and splintered stairs or railings are the most obvious signs of a damaged deck. However, the joists and framework of an older deck may need a thorough inspection to ensure they’re still sound and safe for use. A pro can check a deck’s structure and find hidden pest infestations for $200 to $500.
Decks that are a decade old or more will likely need repairs like a power wash and staining to keep them looking good and functioning well. Stairs that are wobbly and unsafe for people to walk on must be repaired and anchored. Deck stair repairs can cost $15 to $50 per step or $100 to $300 for the entire staircase.
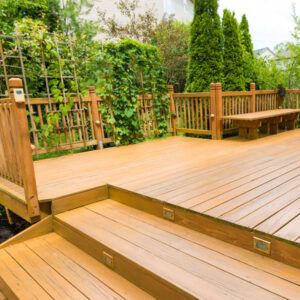
A stained or painted deck can be a focal point of a home’s landscape. However, an outdated or faded deck can make a house look dated and even be dangerous for guests or family members. A pro can paint or stain the deck to match a home’s exterior and update its look.
Some homeowners are tempted to save money by staining their decks, but this project requires professional equipment and advanced carpentry skills. Using a power sander and power washer with a professional can protect the deck and prevent it from looking uneven and patchy. A professional will have access to better-quality tools and supplies for a safer and more attractive finish.
Other factors that go into a deck repair estimate include location, the amount of prep work, and any customizations or upgrades. Homeowners should also consider the type of material the deck is made from and whether it’s a composite or traditional lumber deck. High-end woods like redwood or mahogany are more expensive than cedar or pressure-treated lumber.
A good deck sealer can protect the wood from moisture damage, helping to preserve its structural integrity and allowing it to last much longer. It also helps to prevent mildew, mold, and other unwanted growth. Many different types of deck sealants are available, some designed to darken or lighten the color of the wood, while others are purely protective. A simple water test can tell you if your deck needs a coat of sealant: sprinkle some on the surface and watch how quickly it soaks in. If it beads or pools and stays on top of the wood, it’s time to add a layer of protection.
Before sealing, sand the entire surface of your deck, including any areas that have become rough or scratched over time. This will ensure that the sealant can penetrate the pores of the wood and that it’s unable to bond to dirt or other materials on the surface of your deck. It’s important to take this step even if you have previously stained your deck, as the stain may have worn off in some places and left bare wood behind.
If you have a loose ledger board—the piece of wood that sits flush with your home and connects your deck—it’s important to fix this before sealing, as a loose ledger can cause serious damage if it falls over. Hiring a professional who can use specialized tools to securely fasten your ledger board to its neighboring pieces of wood is best.
When you’re ready to apply the sealant, ensure your deck is clean and free from furniture or other items. It’s also a good idea to cover nearby plants with plastic or drop cloths and any door trim or siding near your deck to avoid accidentally damaging them with the sealant. It’s also a good idea not to walk on the deck for 48 hours after applying the sealant, giving it time to fully dry and bond to the wood.
A coat of paint can completely transform a deck, making it look new and adding to your home’s curb appeal. However, it’s important to remember that a deck must be thoroughly cleaned before painting. This step is vital because the wood must be free of dirt and grime, which can cause the coating to bubble or blister. Additionally, if the deck is damp, the wood can’t fully absorb and retain the new coat of paint.
First, you must sweep the deck and remove any furniture or planters. Then, it would help if you sanded the deck. While a sanding block and sandpaper can be used manually for a smoother finish, a power sander can be rented from most hardware stores. If the deck has rough spots, go over them with 100-120 grit sandpaper and rub until smooth. Using the sander on all the edges of the deck is also a good idea, as this will make getting a soft coat of paint easier for you.
Once the deck is sanded, it’s time to clean it. You can wash it with a pressure washer or soap and water, but be sure to scrub the surface with a stiff brush and remove any mildew that may be present. Using a wood brightener is also a good idea, especially on any spotted areas you have trouble getting rid of.
Moving plants or patio furniture off the deck and covering it with tarps while you work is also a good idea. This will protect the items from any accidental spills, which can be hard to get out of a dark color, and it will keep the deck clean while you are working on it.
Finally, you should apply a coat of primer before you begin painting. This will help the new coat of paint adhere to the deck, giving it a more even color. Finally, you should paint your deck on a clear and sunny day and avoid rain. Rain can cause your deck paint to run, streak, or not dry properly, making the deck look patchy when finished.
Depending on the climate and the wear-and-tear from furniture and foot traffic, some of your deck boards may eventually need to be replaced. Although pressure-treated wood is more durable than natural lumber, it is susceptible to rot and decay if not properly sealed and protected. If the rot is limited to a small area and the board has not yet reached its end of life, it can usually be saved by cleaning and resealing. However, extensive rot and extensive damage may necessitate replacing the board entirely.
You may also notice some warped or cupped areas from water penetration during a resealing job. Often, these can be straightened by pulling out the nails and rescrewing the board in a new position or flipping it so that its undamaged flat side is facing up. In severe cases of cupping, the board might need to be removed and replaced altogether.
Before installing a replacement, it is important to match the appearance of the new board with the rest of your decking. The best way to do this is by using the same type of lumber in the patch as found throughout your entire deck. Otherwise, the patch will stand out from the rest and appear unnatural.
After examining the damaged board, you can either use a jigsaw with a coarse wood-cutting blade to cut away the rotten section, or you can carefully use a hammer and pry bar to remove the entire board. It is recommended to add cleats or sister joists to support the replacement and to reinforce any posts that have been exposed by cutting off a damaged board.
Be sure to clean and stain any areas where wood filler is used, as this will help it blend in with the existing surface of your deck. It would help if you also stained or sealed the new deck board to protect it from moisture and prevent future rot. Finally, you should apply a protective seal to the joists to ensure they resist water.